How the USB connection works
Connecting with a USB cable is one of two ways to connect a printer to Favrit. The printer plugs directly into an iPad and uses the iPad's internet connection. If the Wi-Fi drops, the iPad switches to 4G/5G, so the printer keeps working. The printer also supplies power to the iPad.
When to use the USB connection
Use the USB connection when you want a printer at an iPad station, or if you also need a cash drawer — a cash drawer connects through the printer and only works over cable.
The other option is CloudPRNT, where the printer connects to your local network over Ethernet and prints on its own without an iPad — best for places like the kitchen. See Set up with CloudPRNT.
Some printers can also connect over Bluetooth, but we recommend a cable connection for stability. Bluetooth can drop out, and walls or distance — for example if you rearrange the counter or kitchen — can put the printer out of range.
Equipment needed
For the USB setup you'll need an iPad, an mC-printer, and a cable to connect them — plus a cash drawer if you use one. You can purchase it in the Favrit Webshop.
Setting up the printer
- Remove the back cover.
- Connect the power cable to the DC 24V port — and to a power outlet.
- Reseat the back cover.
- Open the front cover to check that the paper is seated correctly (top feed).
- Turn on the printer by holding the power button.
- Test the printer by pressing the feed button.
Setting up the iPad
Before connecting the printer, make sure your iPad is ready to use. See Setting up your iPad, printer and cash drawer.
Connecting the printer in Favrit Admin app
- Go to the "Hardware" tab at the bottom of the app and tap "Connect Printer" in the top left corner.
- Tap "Connect printer and cash drawer". If you can't find your printer, try the "Old interface" option.
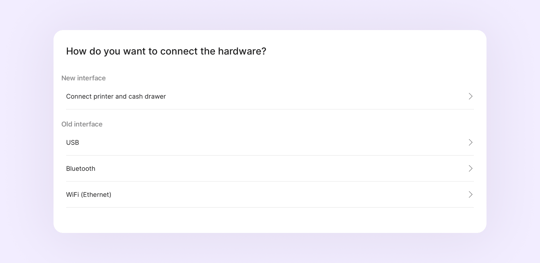
- Wait for the printer to appear, or tap "Search again", then select your printer.
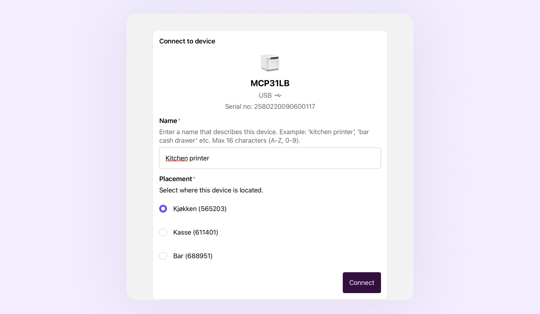
- Enter a name and placement (printer), then tap "Connect".
- Tap "Print test ticket" to test.
Note: Placements are set up and managed by Favrit Support. If you're unsure which placement to choose, or need a new one, contact support.
Placing the equipment
- Make sure the iPad is always (or can be) connected to power. The printer must always have power to operate.
- If the iPad and printer are in the kitchen or behind a bar, don't place them anywhere they can get water damage or be exposed to oil and grease. Keep paper and sanitiser handy so you can wipe the device quickly.
Troubleshooting
The printer shows as disconnected.
Remove (delete) the printer in the app, unplug the printer's power for a few seconds, plug it back in, then connect it again.
The printer isn't found, or you see "Hardware already configured".
The printer may already be linked to another setup. Remove the existing printer entry first, then search again. If it still doesn't appear, try the "Old interface" option when connecting.
You see "Couldn't print, cannot read serial number".
Make sure the iPad is on the latest iPadOS, and check that the USB cable is fully seated. If you can, try another cable or another port on the printer.
Keep the app and iPadOS updated.
An outdated Favrit Admin app or iPadOS version can stop the printer from connecting.
Note that the steps above apply to equipment issued by Favrit. Other compatible devices may behave differently from our standard setup.