
Before you start: Set up tax groups
Make sure your tax groups are configured. Every product needs a tax group for correct VAT to be applied. Learn how tax groups (VAT) work in Favrit.
You can also require that all products have a tax group assigned before they can be saved. To enable this, go Admin > Menu > Settings and make sure the option to require tax groups is enabled.
Go to Admin > Menu to start building. A default menu called "Main menu" is already created for you. You can start adding sections and products to it straight away by following these steps, or jump to the video tutorial.
Import a menu
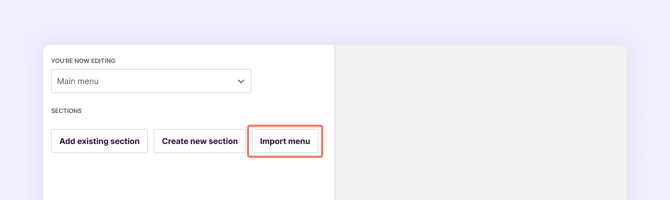
If you already have your products in a spreadsheet, you can import them into Favrit instead of creating everything manually. If not, add the sections manually.
- In the Menu tab, scroll down and click "Import menu".
- Download the import template
- Fill in your products following the template format
- Upload the file to import your menu
Note: Imported products still need printer, tax group, allergens, and a picture to be added manually.
Add sections
Sections group your products (e.g. Starters, Pizza, Burgers, Soda, Beer...). You can create sections from scratch, or add existing sections.
Create sections manually
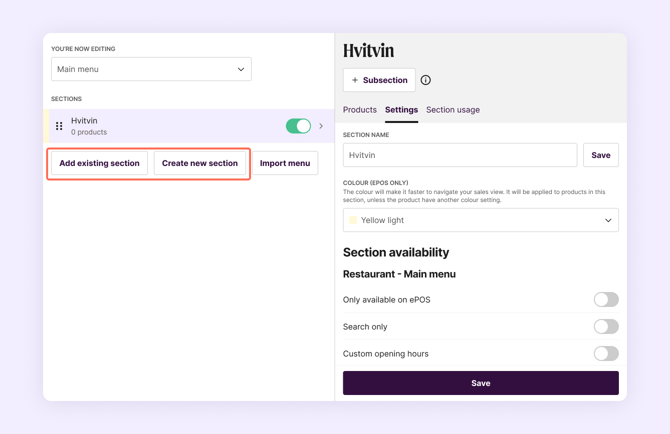
- In the Menu tab, click "Create section" at the bottom of the page.
- Configure name, colour for ePOS, availability and subsections if needed.
- Repeat for each category
Add existing sections
If you already have a section created in another of your menus, click "Add existing section".
If you are part of a micronetwork, contact support to add the section from the producer location.
Add products
There are different ways to add products to your menu:
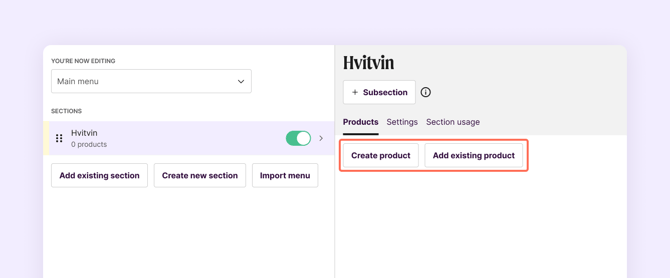
Create products manually
Can be done directly in a section, or in the Product list to add to a section later. Scroll down to Product settings to see how to create products manually.
Add existing products
Can only be done directly on a section. This lets you add products you have in your Product List. It can be products you have already created, or products that have been shared with you (see centrally manage products below).
Add from Supplier Product Library
Products from the Product Library come with names, descriptions, allergens and pictures already filled in by suppliers. Learn more about the Product Library.
Import from Vinify
If you use Vinify, you can import your products directly into Favrit. A menu called "Vinify" will be created, with a "Vinify" section that contains all the products. Rename the section and add it to your main menu. Alternatively, you can create separate sections, and handpick which products should be added to which section with the "Add existing product" option
Note: Products from the Supplier Product library, Vinify and Centrally managed products still needs the printer and tax group added manually.
Product settings
When you create or edit a product, you enter a name, description, picture, allergens, category, tax group, and assign the relevant printers. You can also set a course, add customizations and recommendations, and assign a PLU code if needed.
Product sizes
Sizes control pricing and ordering behaviour. For each size you can set:
- Price type: per item, open price, or weight-based (if weight is enabled for your location)
- Price for eat in and takeaway: these can be set separately
- Default size: which size is pre-selected when adding to an order
- GTIN: the product barcode, if applicable
- Availability: if a product is available or not
For ePOS you can also define whether sizes are shown as separate buttons or as one button with a popup to select the size. This is configured in the Settings tab.
Sharing sections and products to other locations
If you operate more than one venue, you can share menu content across locations:
Micronetwork
Share an entire section with another location. For example if a bar without a kitchen adds food sections from a neighbouring restaurant, or when a food court collects all vendor menus into one shared ordering experience. Learn about Micronetworks.
Centrally managed products
Share individual products to one or more of your locations without sharing the full section.
The locations you share to can only edit some parts of the product:
- Toggle availability on and off, and stock count
- Tax group and Printers (must be defined by each location)
- Price (choose between using the default price or use a custom price)
Share the product
- Go into the editor of the product you want to share
- Scroll down to "Centrally managed product"
- Click "Add location" and select the locations you want to share the product to
- Save.
Add the product
- In the Menu tab, select a section
- Click "Add existing"
- Search for the name of the product, and click to add it to the section.
Additional menus
If you need additional menus (for example, a separate takeaway menu), you can manage them in the Settings tab. From there you can also select which menu is currently active for ePOS and for digital ordering.