What is CloudPRNT?
CloudPRNT is one of two ways to connect a printer to Favrit. It connects to your local network over an Ethernet cable and talks to Favrit's servers on its own.
When to use CloudPRNT
Use CloudPRNT when you want the printer to run without an iPad next to it, for example in the kitchen. Printers issued by Favrit support this — see all supported printers here.
The other option is connecting the printer to an iPad with a USB cable. This works best when you want a printer at an iPad station, or if you also need a cash drawer. See Set up with USB to iPad.
Setting up a new printer
Setting up a new printer takes between 5-10 minutes, and consists of the following steps:
1. Connect the printer to the internet and power
2. Connect a laptop or mobile device to the same internet
3. Press and hold the feed button on the printer, and turn on the printer. After holding the feed button for a few seconds, the printer should emit three tickets containing diagnostics information. Make sure the printer has paper if this doesn't work.
4. Find the printers local IP address at the bottom of the last ticket printed.
5. On your laptop or mobile device, open a browser and input the IP address (e.g., http://192.168.65.251; make sure to not use https, as this won't work).
You should now see a page reading "mC-Print3 Network Utility" for mC-Print3 printers, or equivalent for other printers.
6. Press login and enter the default username and password mentioned on the left side of the page ("root" and "public" for mC-print3).
7. Change the password and save it for later.
8. Go to "Home" and write down the MAC-address (e.g., "00:11:62:34:16:1B").
9. Go to "CloudPRNT" -> Choose "ENABLE" -> Input "https://favrit.com/ws/print-service/v1/cloudprnt" as the server URL -> Click "submit".
10. Go to "Save" and select "Save → Restart device".
11. Click "Execute".
The printer should now restart, and when it starts again, it will start asking Favrit's server for tickets. Once connected to our servers the first time, the printer will print a ticket with instructions on how to complete the registration.
If the printer prints a ticket, keep going with these steps to complete the registration (if not, see troubleshooting):
1. Go to https://admin.favrit.com
2. Go to "Equipment" -> "CloudPRNT"
3. Click "Import printer" and input the MAC-address from step 8 of the setup steps.
4. The printer should now appear in the list, and you should click the "Placement ID" dropdown to decide where the printer should print (placements are an internal concept, and these are created by Favrit staff today. If you're confused about the options here, consider experimenting on your own, or contacting support. Changing this multiple times will not have any negative consequences.)
Et voilà! You're now set up to print without the need for an external device.
Troubleshooting
Nothing prints on the last step during setup?
it likely means that the printer does not have internet, or something went wrong in the setup.
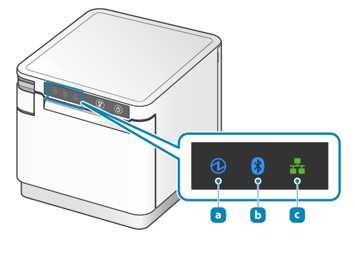
To verify that the printer is connected to the internet, look for a green LED-icon on the printer, (c in the picture) flashing green. If this is not green, it means you're not connected to the internet and will need to find a way to supply internet to the printer before it will work.
If it is green, double check the URL you entered in step 9 and consider factory resetting the printer if you've used this printer with another CloudPRNT server before.
The printer used to print but has now stopped?
f the printer has been switched off for a while, its token may have expired (you might see the error tokenInvalid). Go to Equipment → CloudPRNT in admin.favrit.com and click "Enable" on the printer under Inactive Printers. It will then reconnect.